The reed: A sensitive creator of waves
The reed, together with the mouthpiece onto which the reed is fixed makes the air in the instrument vibrate when you blow into it (technically speaking: create acoustic waves). So the reed is a very important part of a clarinet. Clarinets (and saxophones) are instruments that use a single reed unlike the double reed of the oboe and bassoon (comparison).
There is nothing the clarinet player depends on more, than the condition of his reed and reeds are sensitive and delicate. You hardly ever meet a player who is constantly happy with his reeds. If something goes wrong and the instrument squeaks in a solo, it is usually the reed that gets the blame and that's not always wrong). It is a fact that reeds change when you play them and they wear out. If temperature or humidity (that is: the weather) changes the reed changes. Some players try to improve their reeds by sanding them, storing them in tempered devices (not unlike the cigar humidors), put them in magic fluids etc. Sometimes this will help. But they will inevitably wear out and - however well you treat them - they will become lighter or "softer" hour by hour you play until you better dispose them off. Nevertheless there is no magic in reeds and the more you know about them the better you can cope with the challenges.
Material and production
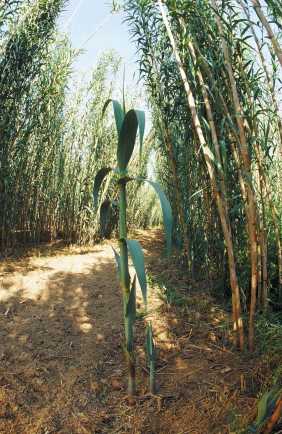
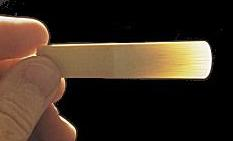
The reeds are made of a reed grass that originally grows in the Mediterranean, called Arundo Donax. Arundo Donax is quite similar in appearance to Bamboo but not as hard. The plant grows to its full size within a year. You leave it as it is for some months before it is harvested. After storing it in a dry place for approximately 2 years (to dry) it becomes as yellow and almost as hard as bamboo.
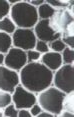
In the inside the reed is made of long, hollow, very elastic fibers lying in parallel. The fibers are glued together densely by lignin. This results in the elastic qualities of the and its high strength. Reed grass can withstand the strongest storms that will bend but not break the living reed. The structure can be seen under the microscope - the picture on the left shows the cross cut.
Reed makers cut rectangular flat pieces of wood from the cane (for B clarinets about 7 cm * 1 cm * 4 mm (about 2.756 * 0.394 * 0.157 inch). Measures will be bigger or smaller for other clarinets.
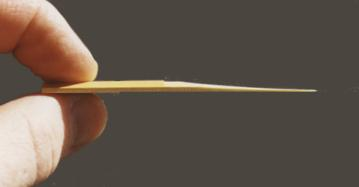
The piece is completely planed down and polished by machines at the base. It is levelled off to at one end (the tip) so that it is only 0.08 millimeters strong. The tolerances of these machines are about 4/1000 mm (1.5/1000 inch). Since the reed is, however, a naturally grown substance, no two reeds are exactly alike although the measurements may be nearly identical.
Depending on both - the form of the curve at the tip and the strength of the material - the properties of the reed (how elastic and hard) are still mostly assessed just by trying out (this can be done automated or by a real player). The reed is then sorted, marked, packed, shipped and sold.
Mechanical copy or CNC-milling - how the cut is created
With the use of modern CNC controllers, today's clarinet reed makers could produce individually optimal reeds per customer - at not so much higher cost than standard reeds (once a digital model is designed for this individual player). This is indeed possible today in Germany (AW-Reeds), but whether it will become standard practice worldwide remains to be seen. A German music magazine published this article on the subject.
Fiberreed, Carbon and similar developments
There were always experiments with different materials that aimed at replacing the sensitive naturally grown wooden reed by a reliable, long-lasting synthetic reed that would under all conditions show the always same perfect properties. Experiments with plexiglas and similar substances failed in the sixties because the physical properties didn't even meet the minimal requirements.
But within the last twenty or so years a clear progress was made with composite substances like hollow carbon fibers, glued together by synthetic resins. These composite substances are already quite similar to wood in their structure. For example Harry Hartmann established an already rather useable product with his Fiberreed some years ago. Out of pure curiosity I bought such a reed for my bass clarinet (in the late nineties). For my taste it was still far too smooth on the surface and was not as good in pp as natural reeds, but it was already impressive how well it worked and the products will no doubt get better. The price then was about the same as a box of ten natural reeds.
Of course a synthetic reed, too, has a restricted life span. However, if this life may last 10 to 20 times longer than that of a natural material, I am ready to pay 10 times more than for a classical wood reed. A long-lasting and reliable reed is valuable, if it has a similar quality as traditional reeds. No wonder there is a market for plastic coated reeds: Those are natural reeds with a thin cover that protects the wood from fluid. You will find saxophone players to be much more open to these experiments than classical clarinet players, which comes as no surprise. Today manufacturers of modern synthetic reeds will tell you that even top classic artists and conservative orchestras use synthetic reeds. It will be interesting to see what the future brings in this field.
Now (I am writing in the year 2020) you can buy artificial reeds of that high quality that I am using them for my Contra Alto Clarinet. It is much less sensitive than a natural reed, you can put it on your instrument "dry", it can't absorb water and it doesn't need that before you can play. That means: You can leave the instrument standing on the stage for an hour and and just grab it and start playing. And there is another advantage: I paid a little less than 20 EUR, I expect it to last for some years - and that makes it *much* cheaper than a box of Contra Alto Reeds. Even if it may be a little less responsive than top natural reeds, this isn't the top critical requirement when playing Contra Alto Clarinets - especially when you only use that instrument for one piece in a concerto. Then it is more important to have reliable response. And I don't feel any disadvantage to my previous reeds.
What role does the reed play when creating a tone?
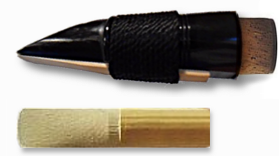
The reed is fixed onto the mouthpiece of the clarinet so that only a very narrow opening remains between the tip of the reed and the mouthpiece. When you close your lips around the mouthpiece and the reed and blow, a tone is created. Technically speaking, the reed together with the mouthpiece work as a valve that opens and closes: The air presses the reed against the opening of the mouthpiece so that the stream of air is blocked. Because the reed is elastic, it immediately swings back and the air immediately streams in again, presses the reed against the opening and so on and so on. As a result there is a pulsed air column in the clarinet whose vibrations cause the surrounding air to swing in waves that we hear as tones. There is a more detailed description with graphics to be found here.
What do we expect from reeds?
In order to work well, the reed must be really thin at the front end, typically 0.08 mm. However, it also must be stiff and elastic, must keep absolutely identical vibration qualities (up to 12.000 times per second) on right and left side and must only gradually change under the extreme conditions of swinging either. One has to consider, too, that this reed will get wet, gets 30-36 centigrade warm (it is in your mouth) which are nightmare conditions for wood. Thinking about that, every reed that works is a small wonder.
Reed classes (Hard/Soft)
Depending on the manufacturer you will find different classes and naming conventions for reeds. Typically there will be numbers like 1 - 5 in 1/2 steps - this gives 1, 1 1/2, 2, 2 1/2 and so on up to 5. Usually 1 is the softest (lightest) and 5 the hardest. If you use a normal mouthpiece and are normally trained and have ordinary jaws and teeth, you will be using 2 or 2 1/2 or 3. If you are used to a 2 1/2 a 2 will let you play an hour longer - and a 3 1/2 will give you sour cheek muscles within an hour. But this is - as I said - depending on the type of instrument, the player and other factors.
The classes are not defined strictly, and from one reed to another of the same class can be individual differences, too. But even in the industrial mass production (e.g. at Vandoren) the differences are surprisingly small. Small manufacturers try out every single reed, there you can rely on a tested reed (at a much higher price, off course).
How to buy reeds
The traditional way is to go to a music shop and buy a box or some single reeds of you favourite brand. Most shops will have the popular brands like VanDoren or Ricoh in stock, and usually also some national brands. The good thing in a music shop is, that if you buy single reeds if you want, and the salesman takes them out of the box - and even if they come in plastic covers, one can often see easily if some of them are not really good. And depending on how the local culture is in your country you might not have to take those. But when you buy a box, then you are caught - it is perfectly normal that 3 out of ten reeds are hardly usable. You can as well order over the internet - reeds of the famous brands are standardized products.
How to treat reeds
There are a lot of different opinions about treating reeds. Some are very specific, and many are contradictory. Most agree that you have to "break in" reeds, that is, in the beginning you don't play on them longer than 15 minutes, so they "get used" to swinging. This may sound strange but most people find that this advice is good.
What I find interesting is that the oboe players, who use similar - but much more sensitive and expensive - material, have come up with some suggestions that I find are well founded:
"Reed cane is cellulose in structure. Like a sponge, it is porous and will absorb water. Always keep this fact in mind when using your reeds. As a sponge doesn't work well when it is dry, most reeds are of little value before you soak them. Soak your reeds in plain tap water before each use. This is preferable to holding them in your mouth to get them wet. There is a lot of protein in reed cane. The enzymes in your saliva will eat away and slowly dissolve the protein, and some essential ingredients in your reed. Your reeds will last longer, and play better when you soak them first in plain tap water, rather than holding them in your mouth, before using them. Once the cell structure is filled with plain tap water, you can keep them wet in your mouth."
... from: http://www.doublereeds.com
You will see that oboe players carry about a glass of water, or, more practical, a small plastic container for film rolls (you will find those in drug stores where people turn in their fotos from non-digital cameras). It is a fact that clarinet reeds are much less sensitive than oboe reeds, but nevertheless this may help us, too.
Storing and transporting reeds
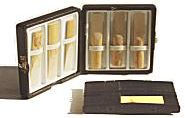
Generally you should treat your reeds as carefully as possible. After playing them one should keep them in special boxes to prevent environmental effects on them. They must be stored in a way that the thin, still moist tip does not develop "crinkles" or waves. Whether it it makes sense to keep them in an air-conditioned box (not unlike a cigar humidor) is still under discussion. But the boxes in the photo are not expensive and proved useful for that purpose. They make a nice present for clarinet players who still carry around reeds in simple cartons or in the typical single plastic cover, in which the moist wood cannot dry and might eventually start to rot!
Is it worthwhile to buy unfinished reeds (blanks)?
Reeds come out of the package ready to play and are pre-sorted in their strength. Blanks are roughly planed reed sections with a smooth underside and "rough" cutout. Usually you still have to do a lot of work on them. But they cost much less than reeds. However, they come in boxes of 100 pieces. The time and experience required to make them ready to play is considerable. Buying and processing blanks is only worthwhile, if you have a considerable consumption and want to seriously pursue reed making (or more precisely: reed reworking). This also applies to the investment in precise copy planing and grinding machines, thickness gauges and the other handicraft equipment. For oboists and bassoonists this is rather normal, but their reeds cost many times more than the finished clarinet reeds and even then they usually have to be adjusted.
So for most amateur clarinettists without professional ambitions and a lot of spare time it is probably not worth while. This also applied to me - I will probably continue to buy finished reeds. This is in line with the fact that the quality of the standard products has been quite good in recent years and that deviations and rejects were decreasing over the years.
Trying out new reeds
Before trying out a reed, you should be sure that the clarinet is in perfect working order, especially that the keys are completely covering the tone holes and that no air escapes anywhere, because otherwise hissing, squeaking and other problems can occur, which may have nothing to do with the reed. How to ensure this is described in chapter "how to fix".
When you take a new reed out of the box, it is probably dried out, even the plastic-wrapped ones like VanDoren (though that will be to a lesser extent). Dry leaves do not vibrate well, so you have to moisten them first - hold them under the tap or put them in a glass of tap water. It takes about 3-5 minutes until the tip is moist enough.
Then you look at the reed's bottom surface: It should be perfectly flat. It is best to place the sheet upon a small glass or plexi-glass plate. The tip of the leaf must lie flat and must not form waves. Then the reed can be tied or screwed onto the instrument and tried out:
First the low register and the g'. Everything should respond well (that is: in piano without much additional hissing noise).
Then check that both sides are equally hard - to do this, play an ongoing tone and turn the clarinet clockwise and counter-clockwise in your mouth about 10°. This prevents first the right side and the left side of the reed from swinging freely. Differences and problems are easy to find this way.
Then you test a few difficult legato jumps. Does everything work? Great!
Are there any problems? Then put the reed into the water and try again later. If that doesn't change a bit, you can start working the reed - or, in really hopeless cases, just dispose it.
Do you give your reed a name?
Maybe you don't have to give your reeds names, but most serious clarinettists take notes on the reed as soon as they are sure what the reed is like - and to be able to distinguish it later on. If you have got many reeds, you can easily confuse them. Even flawless reeds look almost the same. And which was the one that was just light enough to last the two hours of the concert? A water-proof pen (good: CD/DVD marker) writes well on the unplanned back of the sheet, where you don't damage the sheet - and you can see this spot in the leaf box, too.
Working on your reeds
Do you have to know how to make reeds harder/softer?
I am glad I do - it is no rocket science and it can make life much easier (at least it saves money, since you can use and enjoy reeds you would otherwise have thrown away).
Trying out new reeds
Before you try a reed, make sure your clarinet is in perfect condition, because otherwise you might blame the reed for any hissing and squeaking that in fact is the clarinet's fault.
When you take a reed out of the box, it has been dry for a long time. So you want to moisten it (in a glass of water - see treatment) for about 3 to 5 Minutes - then the tip is moist inside, too. Then you examine the bottom. It must be perfectly flat and the tip must not show any curves. Then you fix the reed on the clarinet and try the lower register and the g'". This should sound well, even in piano without much hissing noise. Then check with the c', whether both of the reeds sides are well balanced: You turn the clarinet in your mouth to the right and the left which stops either the right or the left side of the reed to swing. What swings is the other side, and so you can compare them. Then you check some tricky legato jumps. Everything all right? Great! But don't overdo it in the beginning: Many experts are convinced that one should "play in" a reed - like no more than fifteen minutes in the beginning.
Most clarinettists make notes on the reed once they are sure what the reed is like. A waterproof CD marker writes well on the shoulder of the reed, the part, where you can't injure the cut.
Working on reeds - careful small steps - to know, when to give up
Generally you should work carefully! Better do a step again some times than to be too radical, because on the sensitive tip you can't redo anything - pulling firmly over a sheet of sandpaper once can be too much for a soft tip! With more experience you will know in advance how much sanding the reed needs, but in the beginning things will go wrong, too - so you want to start with reeds that are a little older or that come out the box - never start with the reeds you rely on for your next concert...
Sometimes you find that you can't improve a reed however hard you try. Then just throw it away; it is unlikely you will repair it later. It is sufficient if you keep one or two old unplayable reeds that you can use to cover the mouthpieces lay with when the mouthpiece is not in use, for example. Throw away old and unusable material or you might lose overview over your reeds.
The reed's areas
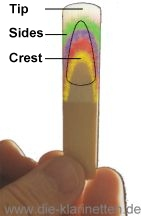
The whole planed area of the reed is called cut.
The colours show areas of equal strength (like height lines on a map).
The tip (white) is the thinnest and most sensitive area, it is responsible
for the high frequency swinging and the attack behaviour of the reed.
The area edged black is the raised crest (sometimes called "heart").
In the raised crest you don't sand except if the whole reed's surface must be redone.
The sides or flanks next to the crest are important for the balance.
The area below the crest is sometimes called shoulder,
here the reed is strong and does hardly swing at all.
The unplanned area is called blade.
Tools to work with reeds
- Sand paper, very fine (wet sand paper -
it says on the back that it can be used wet.)
It should be understood, but if you have no experience here,
some words to sanding:
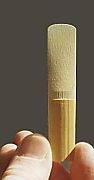
The fine sandpaper should be made wet before you use it on reeds. It is crucial that the surface you put the sandpaper on is absolutely plane - a sheet of glass is good. A wooden board does not stay 100% plane, if it becomes wet often. This would be invitation to desaster. - A very practical thing is a spatula (pharmacy) with fine sand paper glued to it, you may find something similar being readily sold as finger nail sander. Dutch rush or horsetail (dried stalks of a very ancient, wild growing plant - you get it in boxes in music shops and pharmacies, but might collect and dry it yourself - see image), it really works great and it does not hurt the reed's fibres (in contrast to steel files).
- A long and narrow block of Glas or Plexiglas, about 25 * 4 cm, 10mm strength, that you can sand the reeds on, since the block is transparent, you can easily check how thin and how even you have made the tip (see the picture with the horsetail).
- A reed cutter (music shop - see the picture below)
- A strong light that shines through the reed to control your work
- A jam glas with water - to moisten and wet the sand paper, otherwise you'd often have to go to bathroom or kitchen
Flatten the bottom
First you check whether the bottom of the reed is absolutely flat and smooth. Often there still is some dust or the surface is sticky. Or it is not absolutely flat.
Make the reed wet - only work on wet reeds. Then put the reed on the finest sand paper you have got, put index, middle finger and ring finger on top of the blade and push it over the surface away from the tip (like you would move a matchbox car over the floor - no force necessary). Never move a reed towards the tip, because the fibers on the thin tip will then break.
It is not as easy as it may sound - because it is hard to get hold of the reed, and you must not press harder on one side than the other.
Make a reed softer:
Simplest way - if it is a very small correction: You pull the reed face-down over a fine sheet of sand paper (that is with the crest looking down) in an acute angle with only very little pressure. Make sure you keep the reed absolutely horizontal!
Stronger effect: Take the spatula or the horsetail (as seen on the picture left) and make the tip a little thinner. You move the horsetail only towards the tip, not the other way, so the fibres can't be ripped out of their structure. In addition you do make the sides (in the picture above: the green are) a little thinner (but always keep out of the crest). The areas here are the mose sensitive of the reed, so be careful. Doing the sides be careful to work balanced on both sides. Often check by fixing the reed on the mouthpiece, and while playing a note, turn the instrument right and left - then the reed will be hindered to play right or left because it can't swing, and you can easily find out whether its responsiveness is the same on both sides.
Make only the lower register softer:
As described above, but now you work further away from the tip in the blue and yellow are. Here the reed is much stronger, and you can sand away a little more before you find the reed to react.
Make a reed harder:

The reed plays easily, but it squeaks for no reason and it is difficult to keep the tone constant. Forte is clattering and when you want to play fortissimo, you press the reed against the mouthpiece and it shuts and blocks. Actually "too soft" just means the reed swings too much. This can be due to being to thin in the tip or the tip opening between reed and mouthpiece is too thin.
So you can either cut off a little of the tip of the reed (never more than a tenth of a millimeter) and then redo the whole reed (including the crest). Attention when cutting with the reed cutter: Always take out the reed before opening the cutter spring, because otherwise the tip could be destroyed.
As alternative you can put the reed on the fine wet sand paper and then work on the bottom of the reed - while you press on the back (the blade) of the reed. This will make the tip of the reed go a little higher and therefore the tip opening wider. That will make the reed feel "harder". This doesn't work with all reeds, but compared to cutting it has the advantage that you don't have to redo the whole reed.
Problems playing legato:
If legato is a problem, try to thin the sides over the full length with a horsetail.
Squeaking:
Reeds squeak, if their tip is too thin and the crest is to strong. This results in a limited ability to swing back. If you press a reed in an angle of 45 degrees on a sheet of glas, it will bend. A sufficiently elastic reed will quickly bend back fully. If the reed has become to old or is too thin, it will stay bent into the direction a little. Then all you can do is cut shorter and rework the whole reed of throw away the reed, since all measures you take won't last very long anyway.
One side is too soft:
If you turn the instrument in your mouth, you press the reed against one side of your lower jaw so the reed can't swing here any more. If you compare both sides and there are differences, you can try to balance those like described above. But you can as well try the following: You put the reed with its softer side onto the sandpaper (that is upright), and then, carefully, always away from the tip, you pull the reed away. This will make the reed a little narrower, but up to half a millimeter is OK, on the other hand this side will become heavier, too. Since the effect is non-symmetric, you must re-check and balance afterwards.